How to Repair MS Word Document File Manually
It’s quite ridiculous to find people who haven’t used Microsoft Word or don’t know how to use it. We can all run the program well, but sometimes it happens that everything written or edited in our MS Word is deleted or lost. This is usually the case when the power goes out or the computer shuts down suddenly. Moreover, the cause of the virus attack can cause such problems.
But most users do not solve the problem until they start writing again. This is a waste of both time and labor.
But did you know that even if the document written in MS Word gets damaged, you can get back the content written after hours of hard work? In this article, we will learn what Microsoft has said about this problem and what solutions it has given. Also, we will learn about some more acceptable ways to repair MS Word documents manually. Stay tuned!
What’s Microsoft’s solution to repairing MS Word documents?
Basically, MS Word programmatically identifies problems if any of its documents display abnormal activity in their functions and features. Even so, if it is incapable of being identified, you can use the integrated technique provided by Microsoft to fix word documents in order to obtain access.
In the event that a fault is discovered, the function will execute “Open and Repair” while opening the document. This function is also beneficial while saving a file in various file types.
However, before going forward with the possible manual approaches, we basically propose that you use a Word Document Recovery program if you have an urgent need for the lost or faulty document.
Here are some efficient and acceptable ways to repair MS Word documents manually.
Fortunately, Word, much like Google Docs, may well autosave your data, perhaps if you haven’t stored it yourself. Word will indeed attempt to assist you in recovering modifications to a document or recovering manipulated documents. If you have this issue, here we have described several approaches that you could take to repair a word document before you end up losing it completely.
Use MS Word’s default recovery feature
If Word collapses without having saved your document, keep a look to see if your word’s default auto-recovery functionalities have programmatically saved your steady efforts. That’s only possible if you have the later edition of MS Word.
This functionality allows you to restore a collapsed Word doc till the ultimate auto-save extent in several instances. Though it isn’t workable for each and every file, this could aid in the recovery of documents while Word is shuttered.
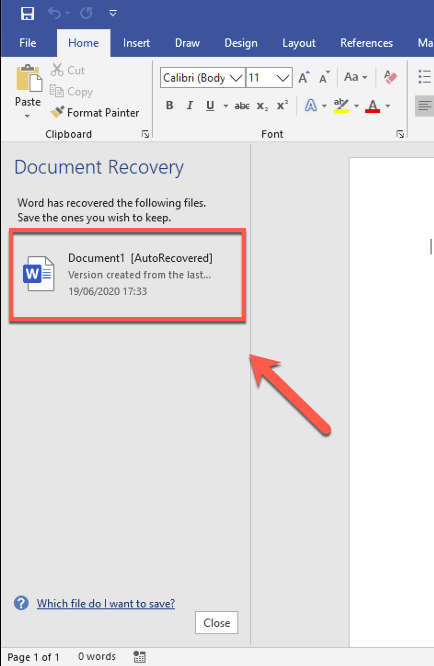
- Initially, reopen Word and build a new doc file. If auto-recovery files are available, Word will display those inside the document’s Recovery Corner tab on the left, indicating when the document was created and requesting that you recover them.
- If you really want to retrieve several of these files, go to the “Document Recovery” corner menu and select it. It will expand it into a fresh Word pane, in which you can just save it correctly by selecting the “Save As” feature from the “File” tab.
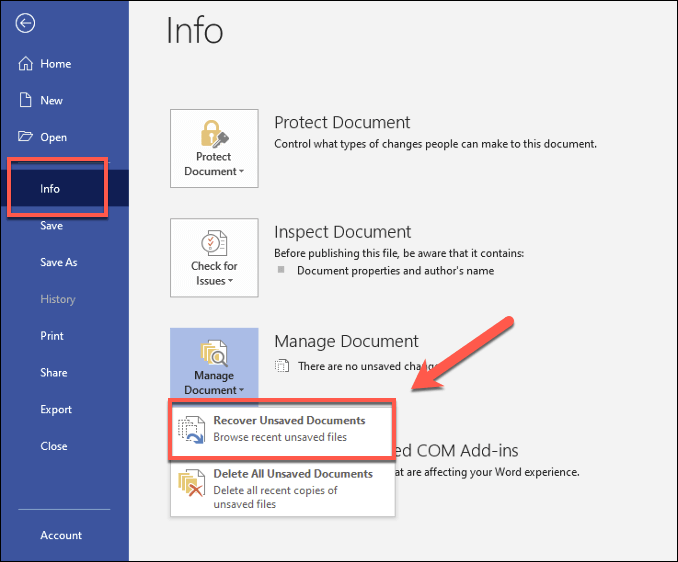
- You can also search for auto-saved Word documents by going to the ‘Manage Document’ feature from the ‘File’ tab’s info section and choosing ‘Recover Unsaved Documents’ option.
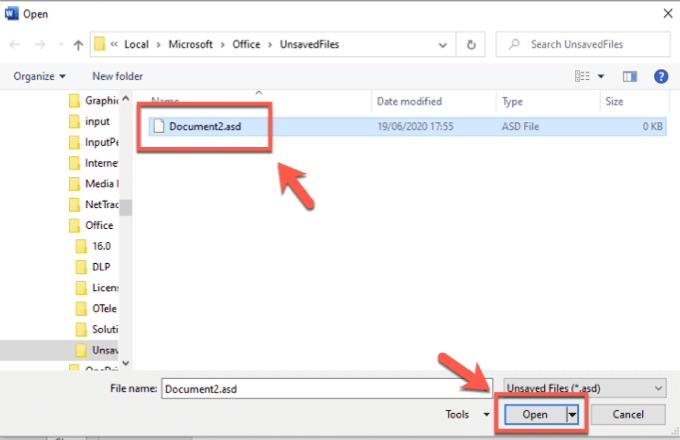
- Inside the “open screen,” you’ll notice an obscured Word folder containing auto-saved files (probably stored in.ASD format). Choose one from the file list, and afterwards press “Open” to access it.
- When Word has launched your retrieved document, save it individually by selecting the “Save As” option or by tapping the “Save” button in the Retrieved Unsaved File display, which appears beneath the ribbon bar. As a result of this, you will be able to save the entire content in the simple Word.docx file format.

Use the “open and repair option.”
- Start MS Word and go to the “File” tab.
- To choose the defected document, press “Open Folder”.
- Emphasize the document and afterwards press the “arrow” symbol next to the “Open” icon.
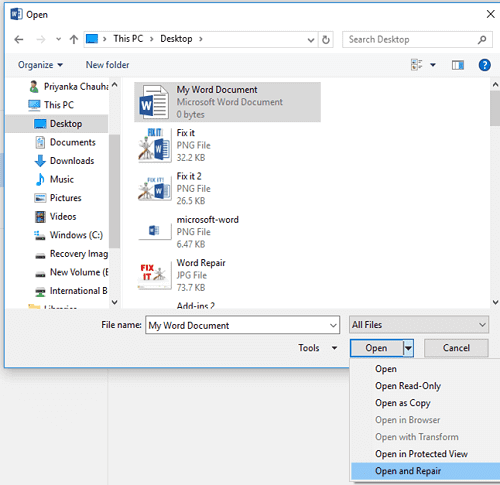
- Choose “Open and Repair” from the listing menu.
It’s really critical to confirm if the error has been really resolved after completing the repair method. To test it well, start the process with the document and see if there are any anomalies in its features and functions.
Change the format of the document and try to save it later
It may be used as the first remedy for MS Word file restoration if the methodology fails. Keep reading the below steps.
- Launch the Word program and select the “File” menu from the ribbon.
- Afterward, press “Open,” and after that, pick the defected Word file and tap “Open.”
- Now, save it in another format (For the time being, we have saved the file in.rtf format).
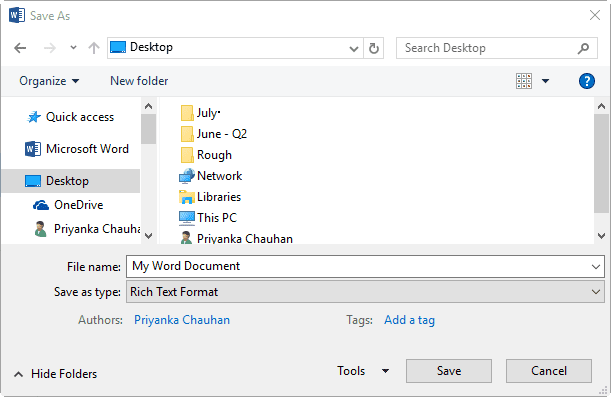
- After that, save the file again to the Word file (.docx) that you previously created.
Modifying the document format of the faulty Word file is a simple procedure for gaining access, but if that doesn’t assist in solving this major issue, our recommendation is to take the help of a professional Word Document Recovery tool.
You can download this application from here:
FAQs:
Q. How can this tool fix a Word document that has been corrupted?
A. Yes, this tool best in the repair of corrupted Word document.
Q. Is it possible to recover all MS Word document files that were deleted?
A. The software comes with two effective recovery options that let users recover almost every deleted Word file.
Q. Is the UI user-friendly?
A. This tool has an easy-to-use interface that makes the process of repairing docx/doc files go as smoothly as it has never gone before.
Q. Is it possible to keep the result log report with this Tool?
A. This tool allows users to save a log file of results, such as a corrected Word file, the start of the process, the end of the process, and so on.
Q. Does the tool compatible with Windows 10 OS?
A. Yes, this excellent software works properly on Windows 10 and all previous versions.
I am a Technical Writer at SoftMagnat Software and having experience around 8 years, focused on creating clear and user-friendly documentation for software products. I simplify complex concepts into easy-to-understand guides, manuals, and tutorials.


